Saturday, April 20, 2024

PRR 19182 - X54 Construction Completed and Primer


PRR 19182 was finally primed after some final details were installed. The model was originally grit blasted using baking soda and a Paasche Air Eraser to eliminate any unsightly build lines. The lines while visible in harsh or extreme angles were not detectable to the touch. The model was cleaned, allowed to dry, and then air brushed using Floquil primer. Once the primer sets, a coat of Scalecoat II Boxcar Red #2 will be applied. Having seen the images in primer now, it clearly shows how well the printing of the X54 is compared to similar models.


Tuesday, April 16, 2024

PRR 19182 - X54 Construction


Construction of the Bridge Line Design / 3D Central PRR X54 is nearing completion with the addition of several additional details. This is a first foray into resin printed models for me and it has gone as smoothly as compared to working with the resin and styrene kits. I grit blasted the car body with baking soda shot through my Paasche air eraser to smooth out any layering, however, this is not detectable by touch and cannot be seen with the naked eye unless placed in an extreme light angle. Primer will eliminate this, so it should not be a deciding factor in your purchase. I followed the instructions and supplemented the kit supplied details with some additional after market parts that you may choose to add to your model.

Some of the take aways I've learned are to take extreme care when drilling into resin printed shells and use a sharp, preferably new bit. The B end of the car yielded a slight casualty when drilling for the brake wheel adjustment rod. The body contains an extant hole for the brass mounting point which I drilled using a #78 bit, which was then increased to a #70 bit. The thinness of the resin at the lower sill became an issue when I attempted to mount some 0.015" brass rod into the hole which ultimately broke. My intent was to install a clevis contained on a Detail Associates brake kit, using a drill and pin method, however, the resin failed and left a small hole. The images show the body filler used to fill in the void which will be sanded smooth and Archer Fine Details HO scale car rivets will be applied to compensate for the damaged lower sill.


The X54 kit contains some useful parts, however, I supplemented Tichy brass rod for all of the grab irons which required some custom bending. The end tack boards of the prototype appear differently than that which is included in the kit, so I used some from the scrap box. The ladders were sourced from a Detail Associates 6241 set of 8 rung ladders on 16.25" centers. They are not exact and if I were to detail another kit, I would use the Tangent parts to best represent the PRR Sam Rea shops appliances best. The brake wheel and housing are a combination of Moloco and Kadee parts, while the Hi-Tech Details air hose details really set the end details off. 

The brass stirrups are well executed, but the plane of the bottom step could be best represented if oriented parallel to the railhead such that the thinnest cross section can be seen. This is really splitting hairs, but something I feel could be represented by an additional bend on the brass fret. The running board was an exact fit and was cemented into place using canopy cement. I sanded both sides to remove traces from the etching process, applied canopy cement to the risers, and aligned the running board onto the center of the car. An additional lateral support using 2"x2" styrene lengths were applied to allow the laterals to stand proud of the roof.


The underframe has been minimally detailed and I am looking to source better parts to augment the existing details. The underframe is secured into place through the draft gear which is screwed to an interior support to allow for alignment. The non-cushioned draft gear has excellent key detail on the exterior. I really like this method of securing the body to the underframe. The underframe is riding on shop trucks for now, however, Bowser PRR 2D-F8 trucks will be used on the final model.


With the final details and some additional sanding on the ends, I think it will finally be ready for a coat of Floquil primer. Overall, the Bridge Line Designs X54 is an excellent kit to begin your journey into resin kit modeling, and with some additional refinement can be made into a show quality prototype model. If successful, I could certainly use a Penn Central example to cut into my block of insulated boxcars and RBLs, as well as expand the fleet with the newly released Bridge Line Designs 50' PRR X53 prototype used throughout the nation. I recently read a comment that bears repeating, "We are all PRR modelers," and isn't it the truth.

Saturday, March 30, 2024

PRR X54 RBL Distraction - PRR 19182

Image courtesy of G. Elwood's Fallenflag.org, Leroy Dozier photograph
          
While I should be writing about all things SAL, SCL, and ACL related, I was recently entranced by the likes of the new Bridge Line Designs / 3D Central Pennsylvania Railroad X54. This is an all new resin print of this unique 40' RBL. Before eyes roll, grunts are heard, and sweating begins, I really like RBLs and well that is enough justification to include at least one example of these unique cars.


Leroy Dozier, who is quickly becoming one of my most frequently liked railroad photographers given the number of FGE subjects he shot, took this image of PRR 19182 in November 1965. The car is slightly ahead of my era, but the presence of the reweigh stenciling and the dedicated service to Camden, NJ marks it for roster inclusion. 

The model is excellent in all respects, and while I am not a Pennsylvania modeler, I quickly learned some interesting facts about the X54. The series information, also courtesy of G. Elwood's Fallenflags.org website is included below.


Images courtesy of G. Elwood's Fallenflag.org

The X54s were numbered 19000-19399 while the X54As were numbered 19400-19499. The differences appear to be the use of differing load restraints, a slightly reduced cubic capacity, and a lower nominal capacity of the X54A. The model includes an etched fret of ladders, grab irons, brake levers, running board, brake steps, and cut levers. The body and underframe are separate to allow for entry into the model, while the roof is integral to the model. The fidelity of the model is excellent with no raised areas or inclusions. The striations seen are from the printing process, which will be covered when primer is applied.


To accurately model the X54 in the past has meant using the old Front Range/Accurail 40' RBL to approximate a X54, however, Bridge Line Designs and 3D Central have truly expanded the horizon for those interested in RBL traffic. The X54s were used in service which required temperature protection such as canned goods, paper products, etc... My example will be used in beer service and accompanied by smaller 40' FGE RBLs which were used by SCL to frequently distribute various beers from Florida.

SAL 580751, Image courtesy of G. Elwood's Fallenflag.org, photographer Leroy Dozier

SAL 580752, courtesy of RRPA, photographer Matt Ferguson

The X54 model will receive some additional upgrades to include a Moloco handbrake housing, Kadee Universal brake wheel, Hi-Tech air hoses, and wire grab irons and brake rigging. The ladders are finely etched and will be my first use of using flat etchings to represent the prototype. If not sufficient, another solution will have to be determined. The Microscale PRR 40' boxcar set 87-1200 will be used to source much of the data, however, the K4 Decal set expressly drawn for the X54 will also be used to capture some of the finer lettering. My model will be primed using Floquil primer and painted using a mixture of ScaleCoat II Boxcar Red 2 and Oxide.

The trucks for the X54 will be sourced from Bowser, or an old Red Caboose X29 kit if I can locate one in my stash of parts. The uniqueness of this truck is apparent after you study how different they appear from a typical AAR-Y truck. The model's instructions are clearly explained, and this should be an excellent project for someone needing a smaller RBL. 


Saturday, January 20, 2024

SFRP 2106: The Struggle of Orange

The developments in our hobby are astounding. The use of sound, DCC, lighting effects, and modern tooled freight cars has really brought forth some amazing models in recent years. The Rapido RR-56, RR-60, and RR-61 are an example. 

In several previous posts, a review of the Rapido RR-56 left me considering the color of the models. I know it was expertly researched by many prominent Santa Fe modelers and historians, but to me the color just wasn't correctly rendered. I purchased John Moore's Santa Fe Mechanical Refrigerator Car book and the Santa Fe color guide by Morning Sun Books along with several images from Bob's Photo and the more I saw the color, the more I realized it was not suitable for me. I also located many images of these cars in color from sites such as Railroad Picture Archives, Railcarphotos, and private collections which confirmed the prototype shifted to a darker orange than as delivered as these cars were reconditioned during their service lives. Additionally, I learned there were only four examples of the Texas Chief scheme to include SFRP 2095, 2106, 2154 and 2157. In trying to determine which prototype to model, SFRP 2106 was located on G. Elwood's FallenFlags.org website showcasing both sides of the car. Ideally, this is an excellent prototype situation to have as it is not often modelers have the ability to see both sides on the same date. The reverse side of the image not shown is usually considered to be artistic license beyond what is seen in the image, so having both sides is a true benefit to the modeler.


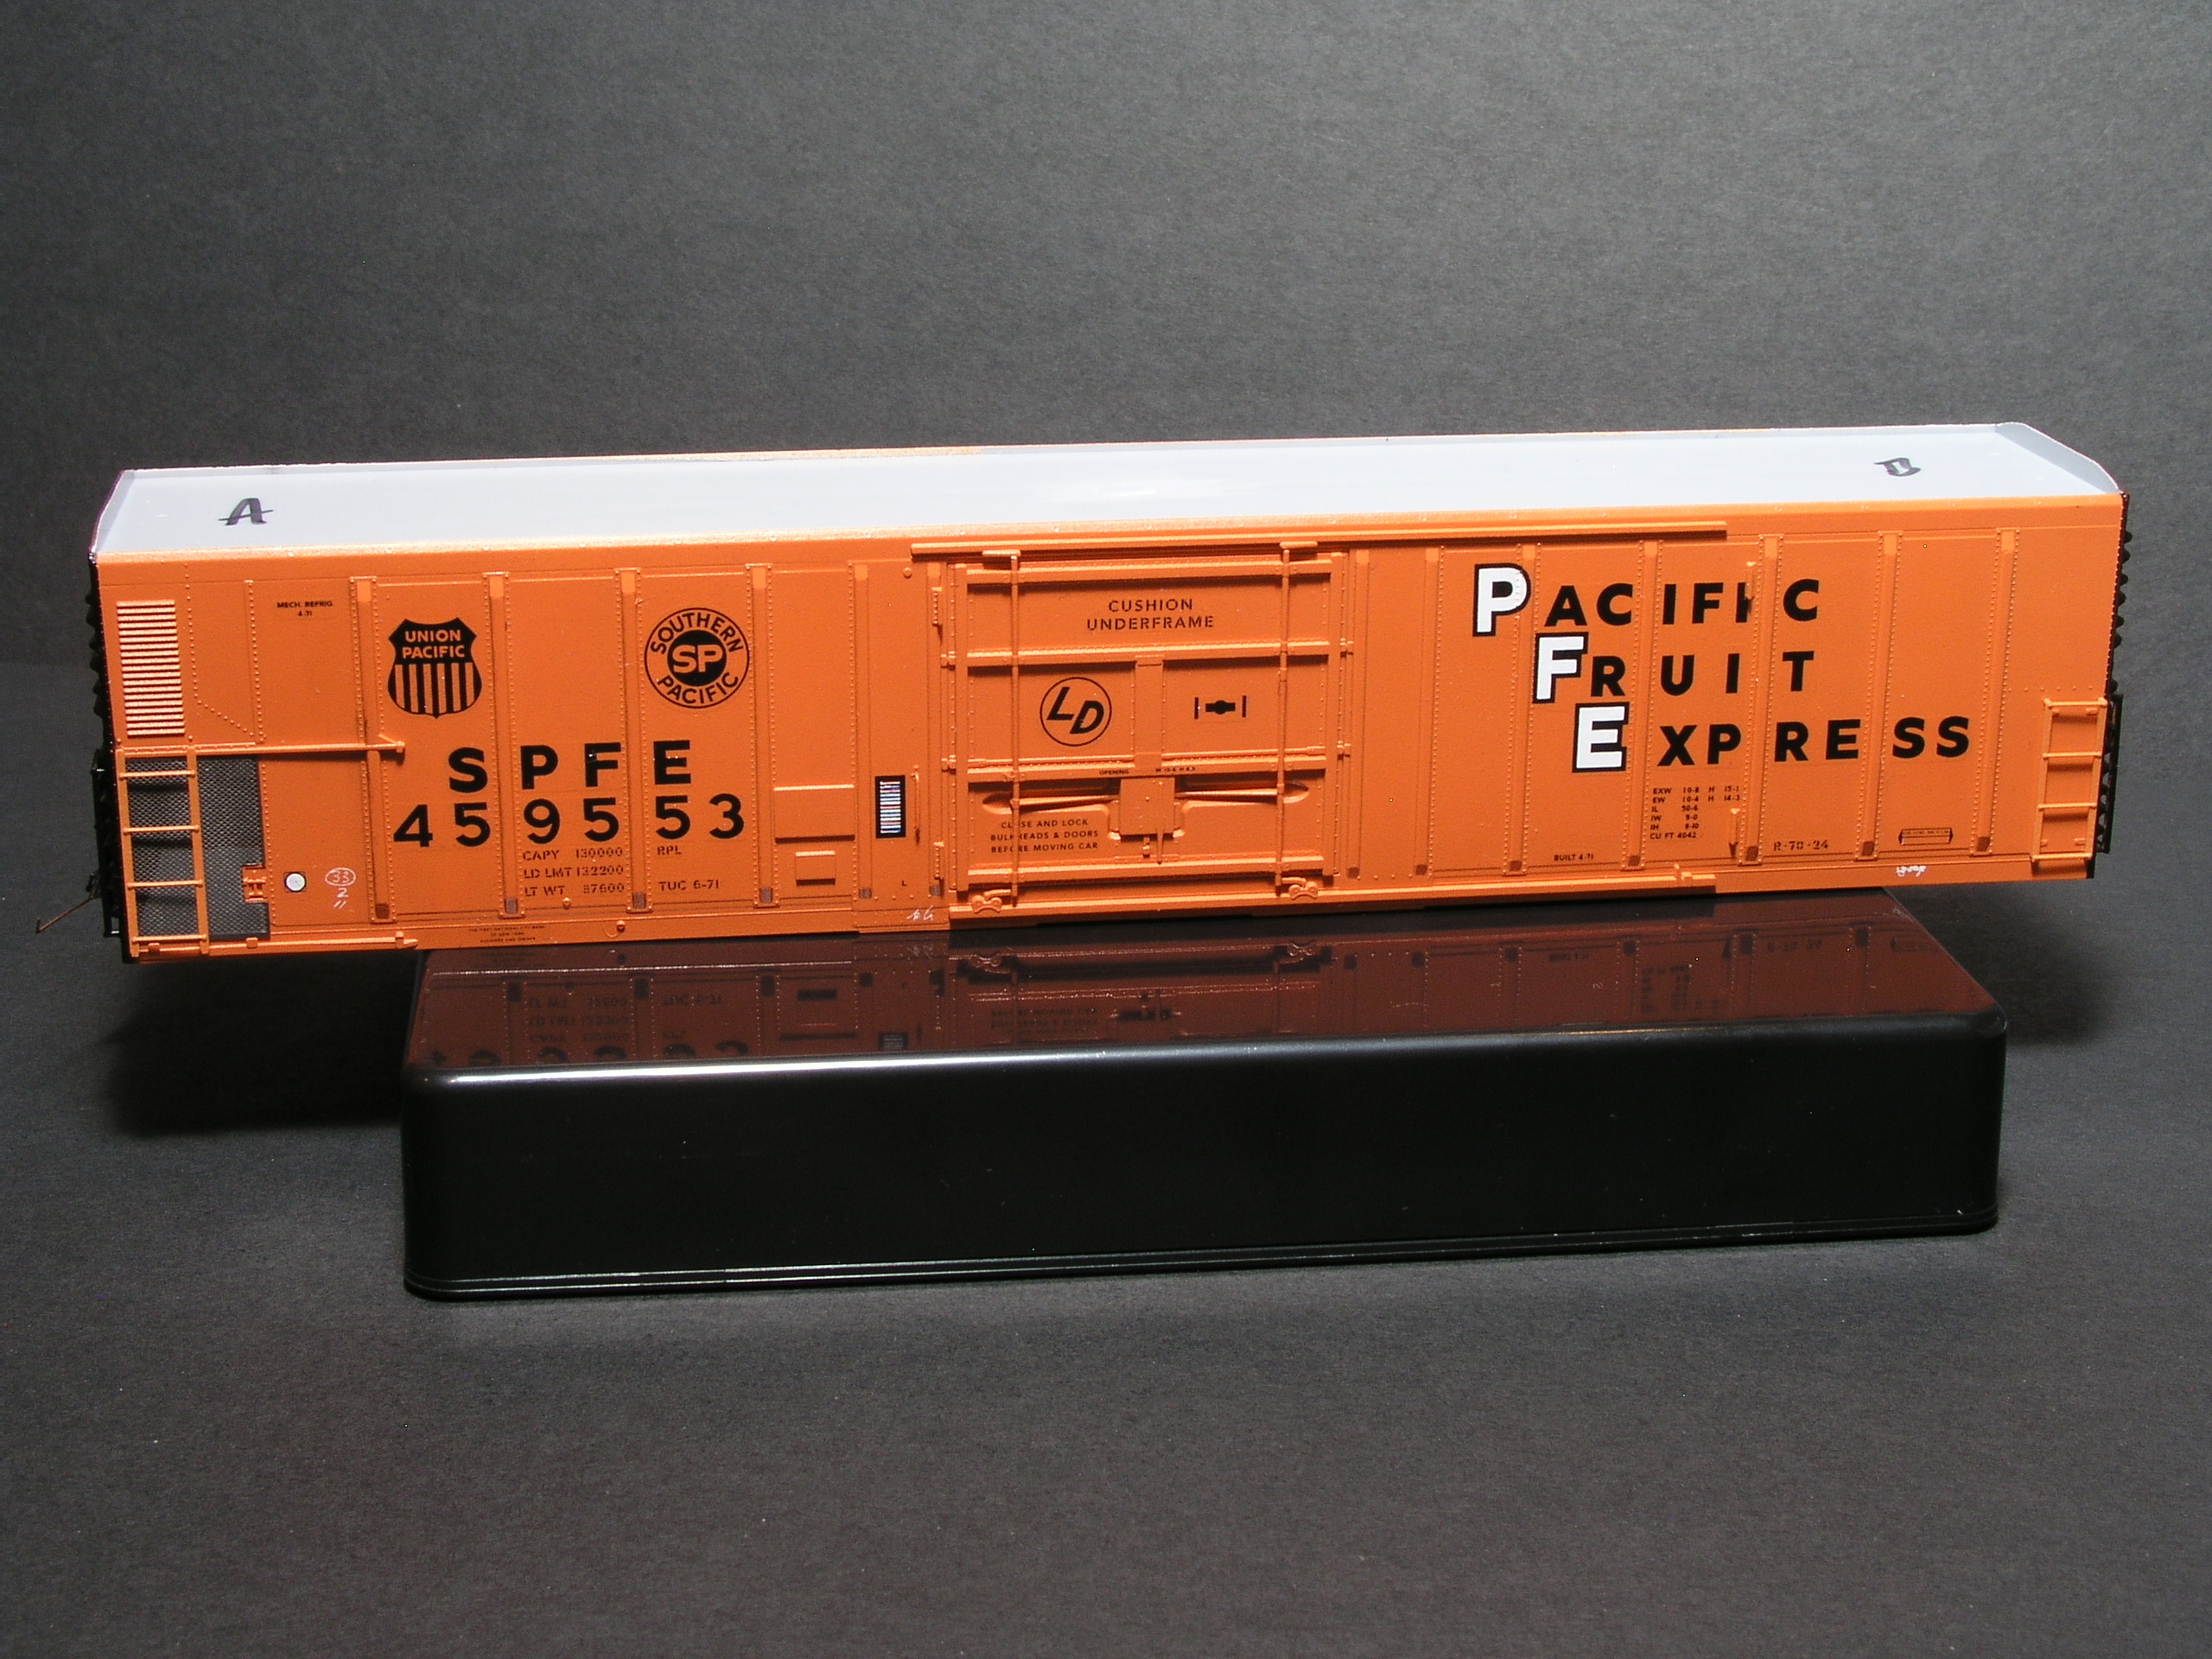
Previously, I described how I struggled to determine the correct orange color for these cars and as such decided to use Tamiya Yellow, Orange, and Red in a 15:1:1 ratio. It was acceptable, but I never really liked the hue developed. I even went so far as to completely decal and finish the car before deciding that it still wasn't close enough and that I could do better. 


These cars aren't easy to paint given the black sill tabs, the orange base coat, the silver roof, and blue doors, but I wasn't happy with my result. The scaling of color wasn't correct and trying to match a fifty-five year old image is a daunting task. The variation in film, scanning quality, and the brightness of the image can all be considerable factors to making a model look correct. The scaling of color is a mine field at times. I attempted to color match several shades of the desired orange hue using Tamiya Yellow and Orange. I decided that after 12 different combinations, it was time to get it close enough and compare all of the oranges in my collection. Ultimately, I found myself going back to an old 1/2 bottle of Floquil Military Colors Orange. 

The car went into a container of 99% Isopropyl Alcohol and was stripped once more down to the bare plastic. Once devoid of the orange and other assorted colors, I grit blasted the model again and primed it using Floquil Primer. Once dry, the model was painted again with Floquil Orange. 


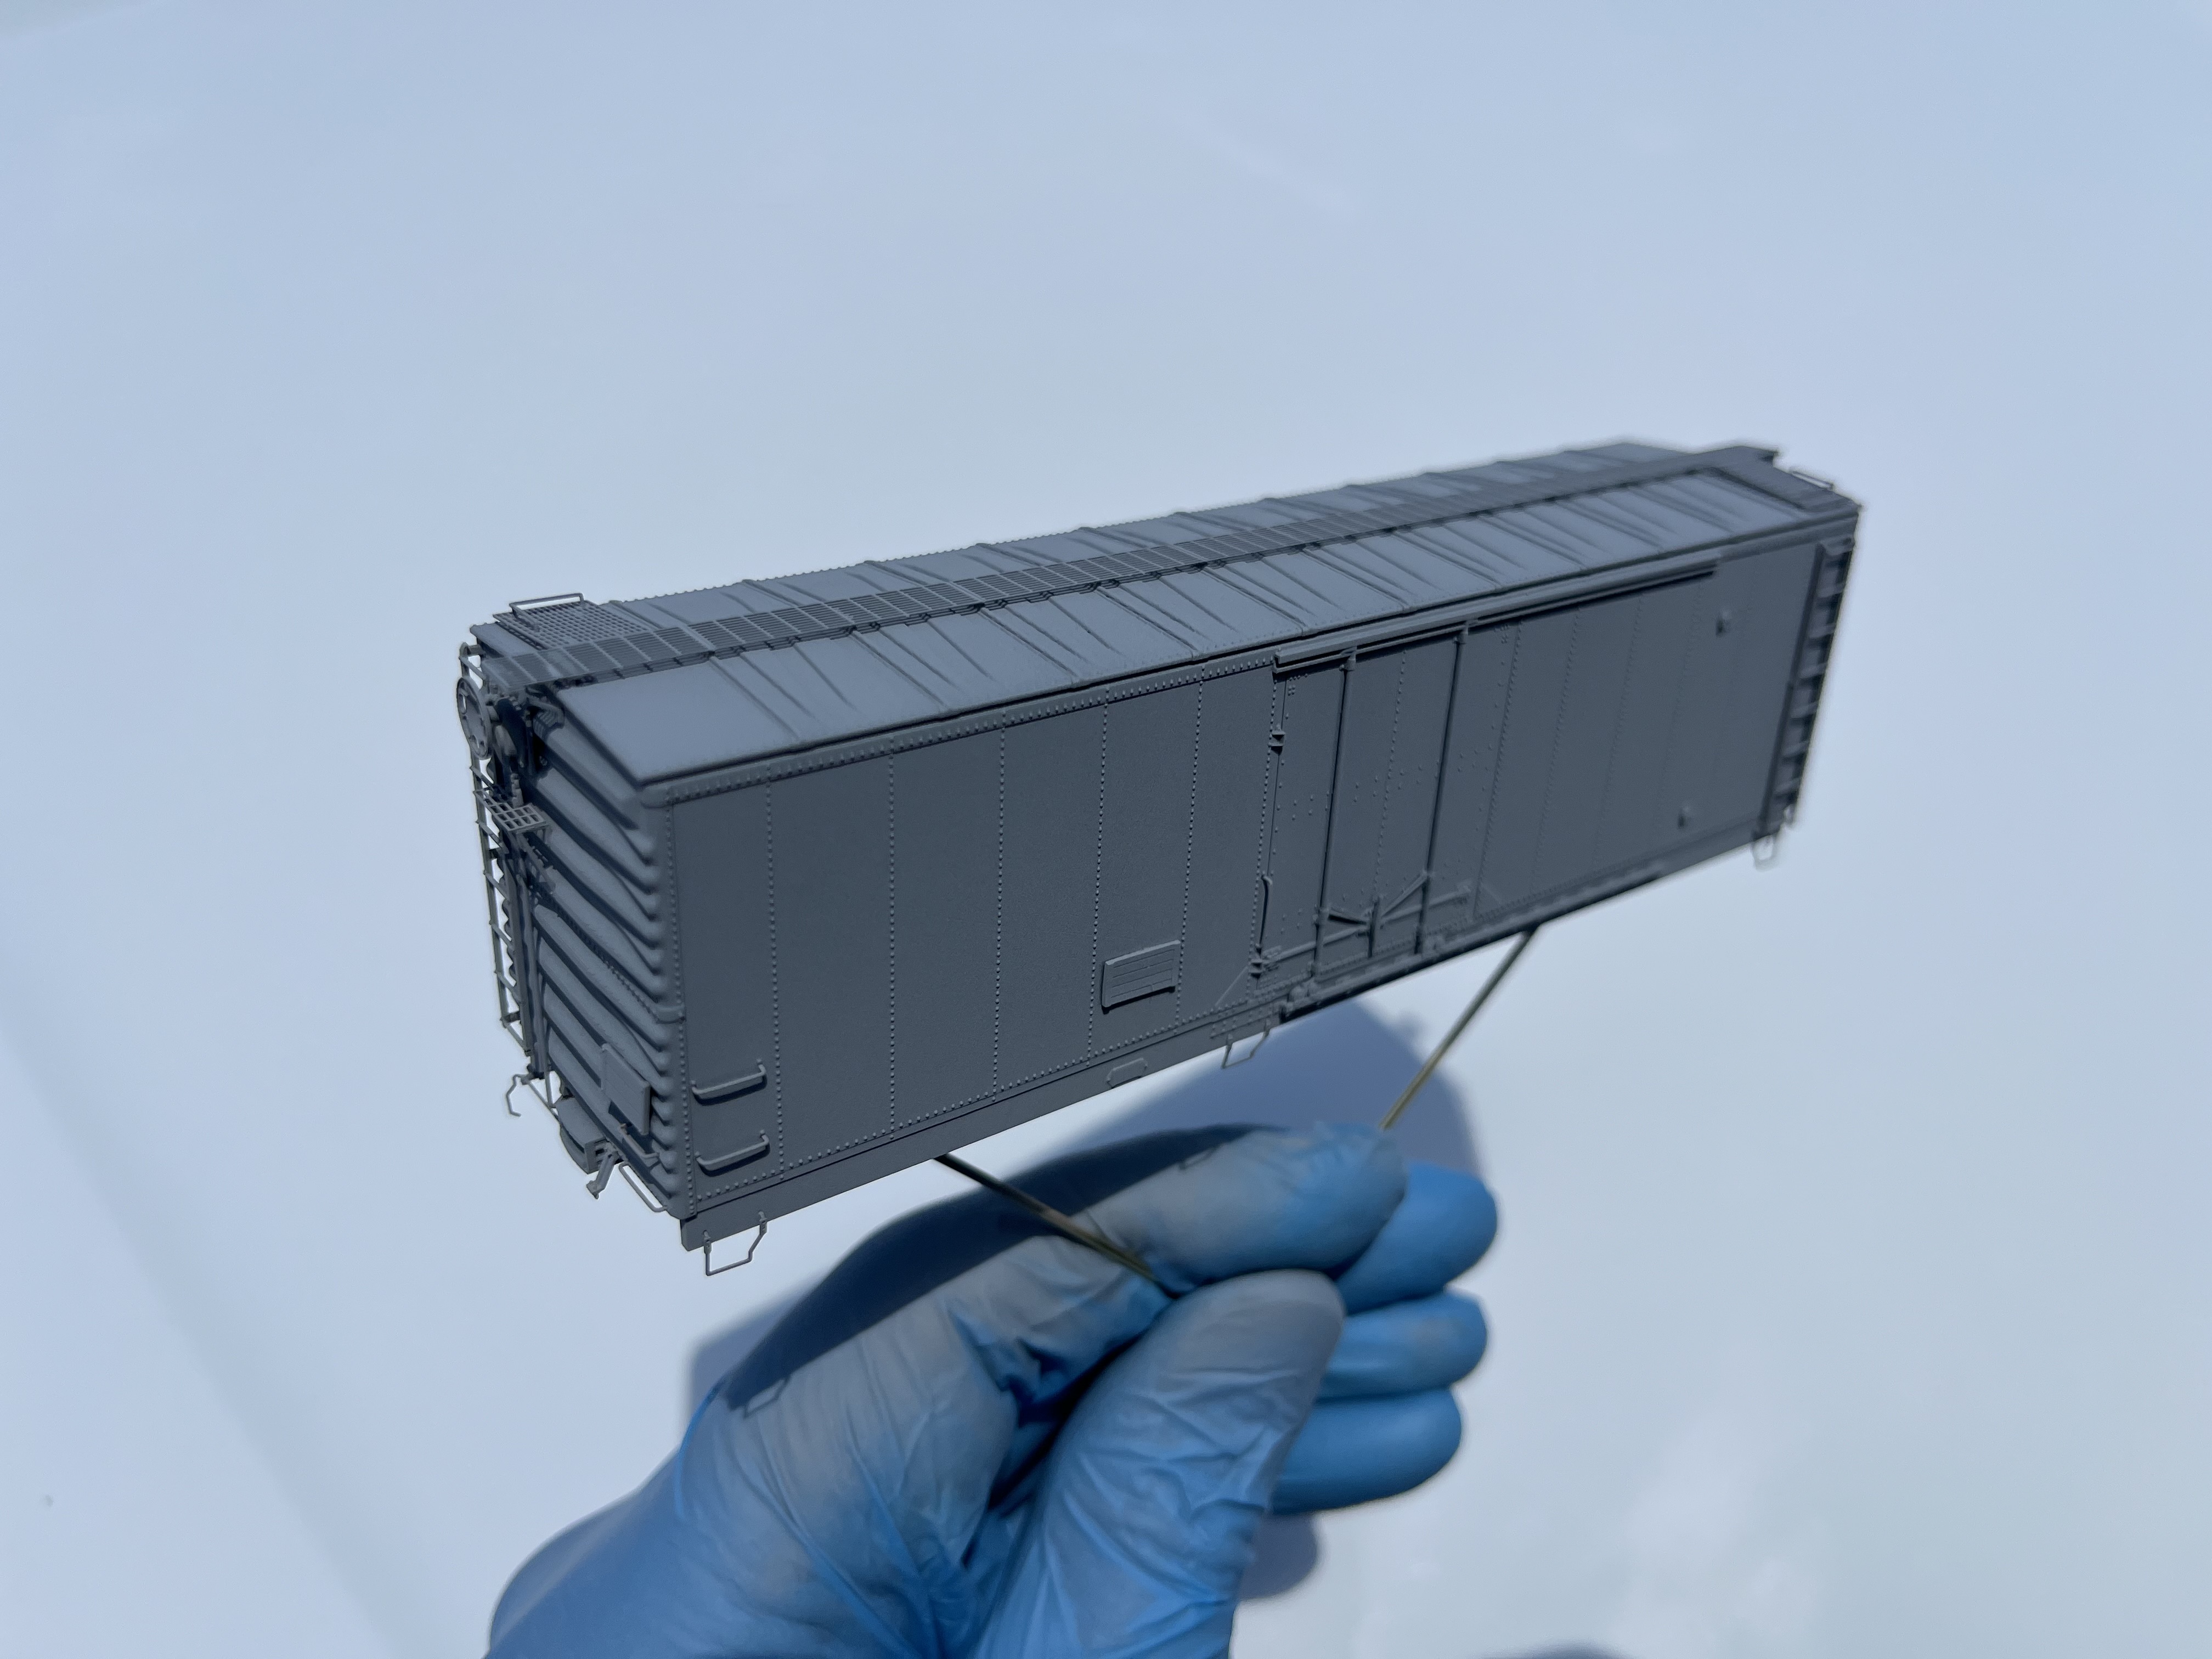
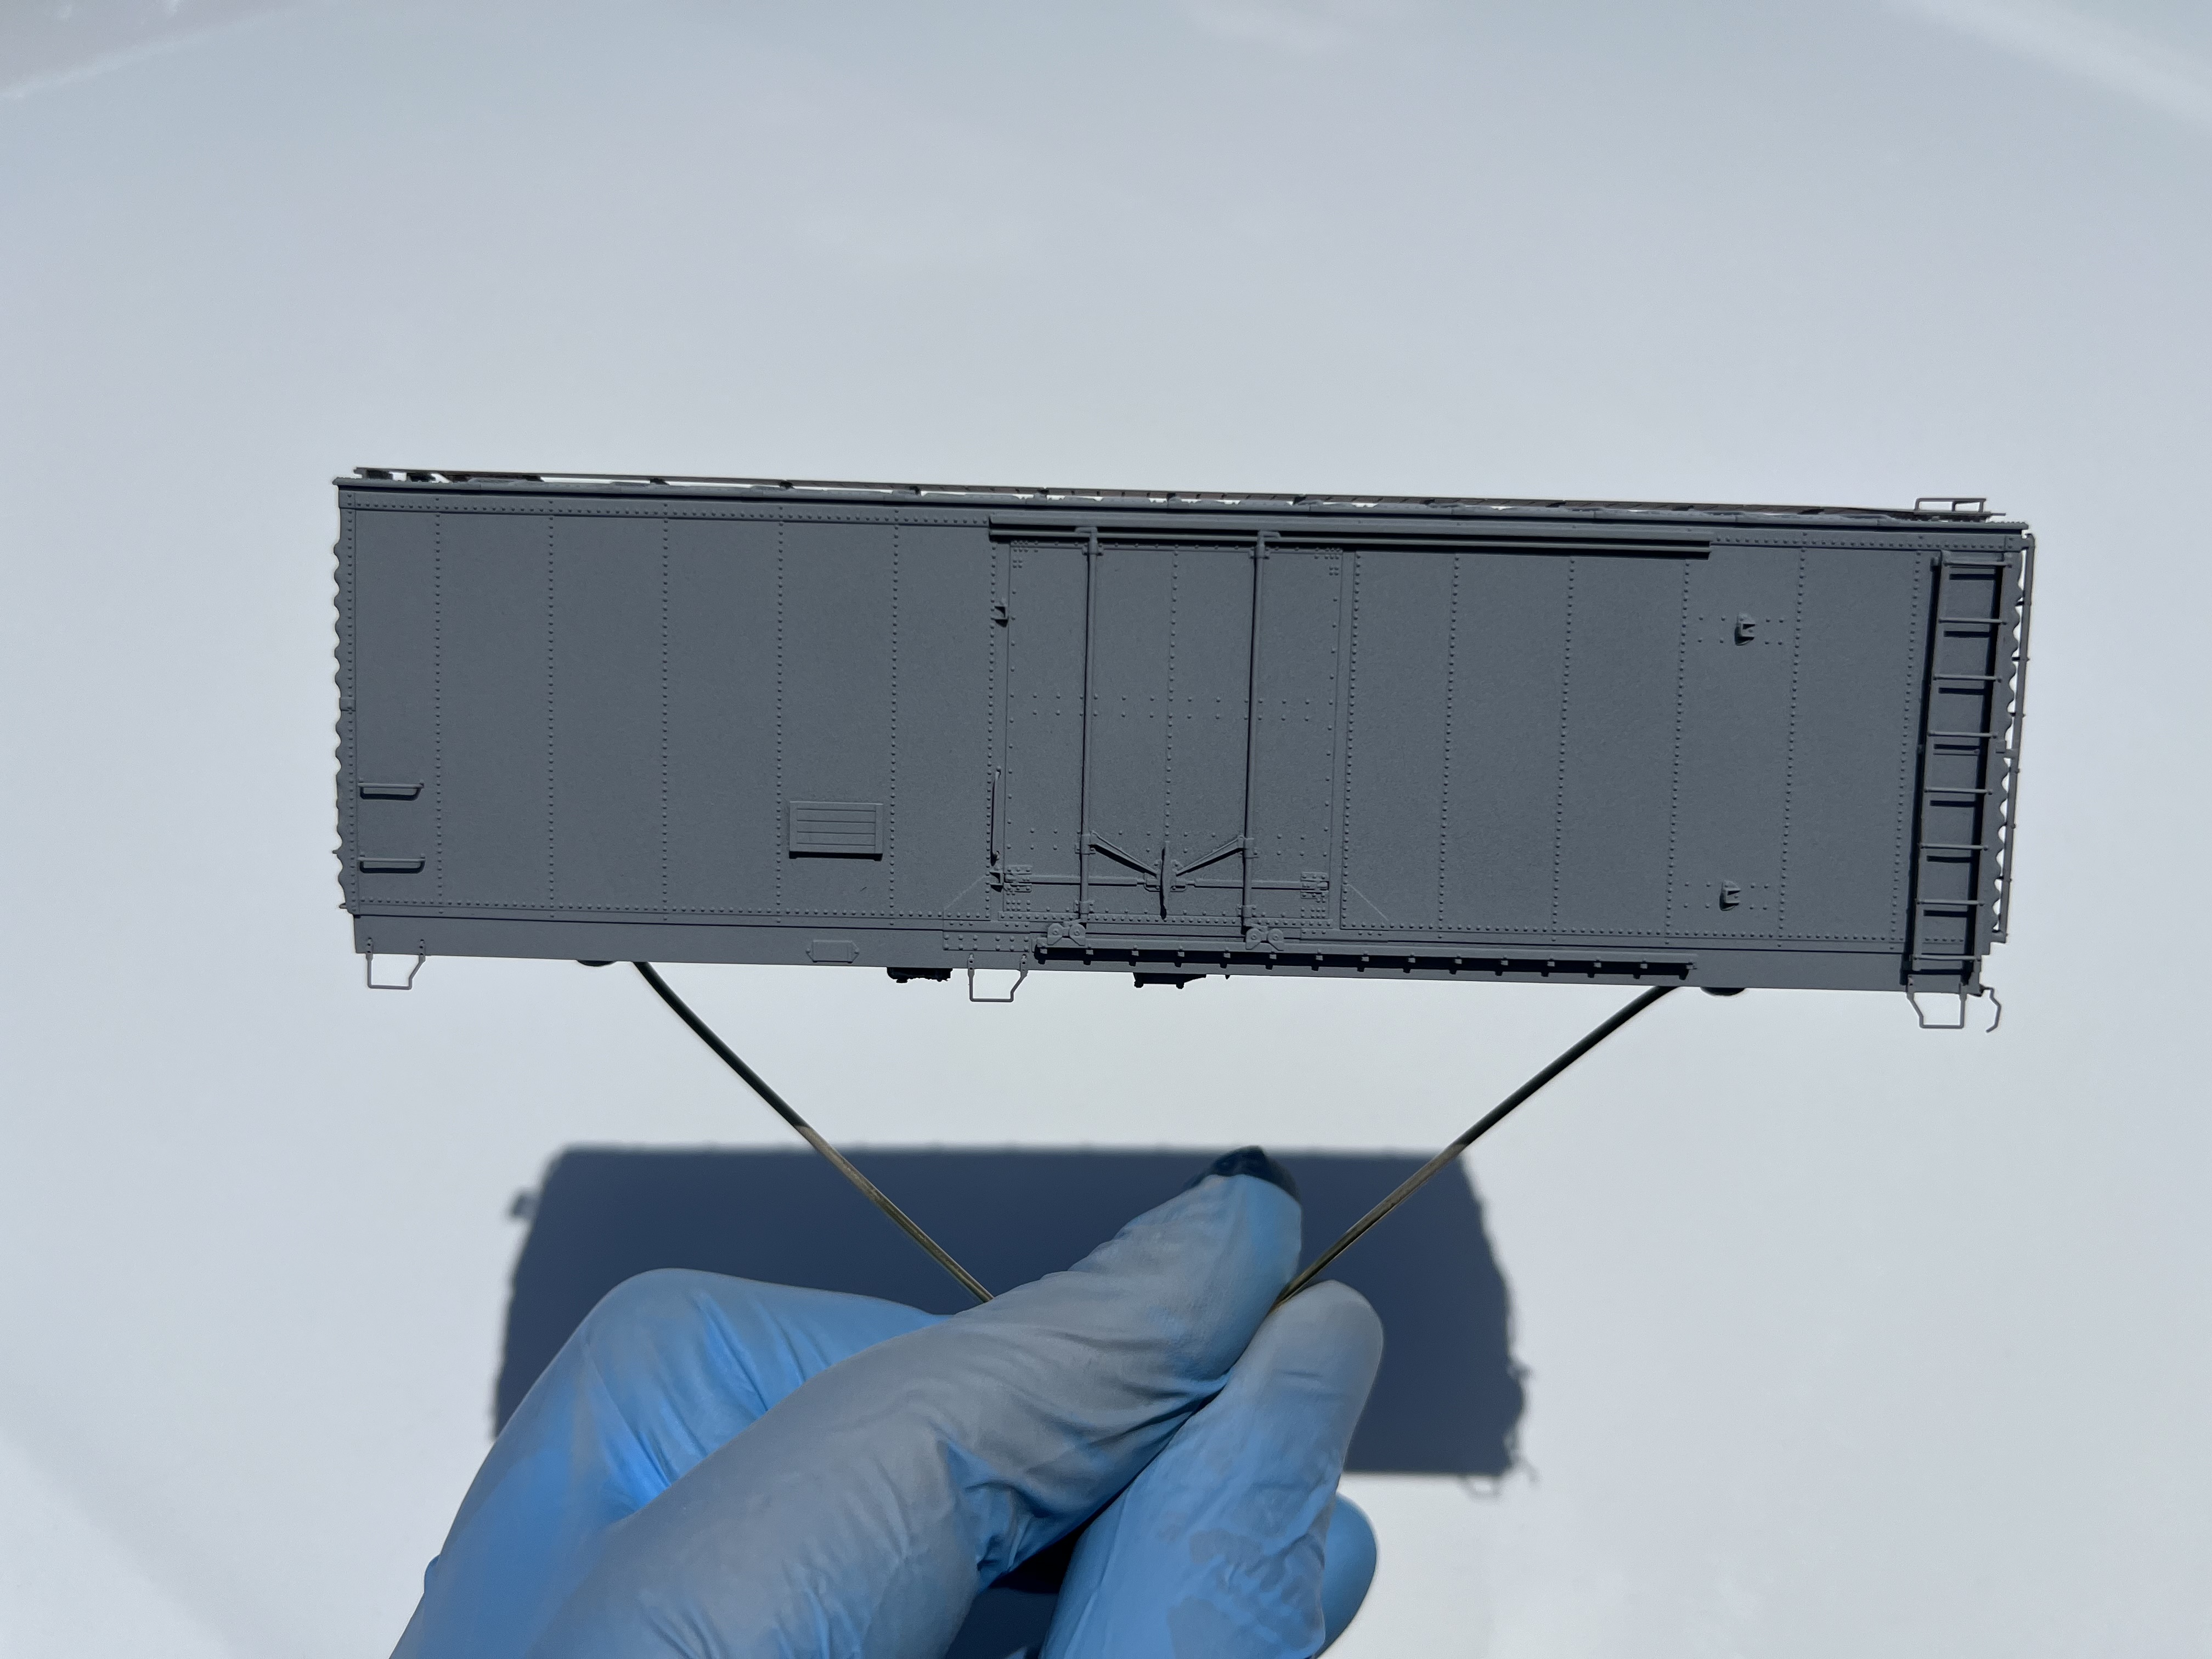
The sills on this model are unique and contain a small continuous edge below the lower sill of the car. Visually, one can see the intermittent orange and black delineation when the car is on the side, so my next step is to mask the sills completely and paint the black continuously along the sill and tabs so that the eye cannot see these breaks of color. To properly do this, I removed the ladders completely so that masking tape can be applied below the lowest rungs and the ladder stiles. The corner braces where the sides and ends join will also be masked and painted black based on the prototype's appearance.

The other reason for repainting the model was the location of the passenger car slogan. The "e" in Texas was placed directly over the upper door stop. The image of SFRP 2095 shows a slightly different placement of the slogan.


Since deciding to rebuild the model, I am awaiting more decals and will attempt to render a better model than before. I was able to purchase a set of Plate C Models ASF trucks to remedy the model's only real issue being the truck side frames. The struggle of Orange is real and upon us.... 

SCL 5259 Progress Report #2


In an effort to eliminate some squirrels of 2022 and 2023, I unearthed the parts for SCL 5259, a Plan 7600 52 seat coach. As previously described, the model was primed in light gray and then painted. Using Tamiya acrylic paints, the model was airbrushed using Tamiya XF-57 Buff which was far too dark. Once dry, the model was airbrushed with Tamiya Deck Tan XF-55. The color was suitable for the model and appeared to match photographs on hand. 

Once dry, the sides were masked for the application of silver to follow the prototype's appearance. The model was masked using Tamiya tape and burnished on the edges to ensure no bleeding. After looking for a suitable metallic, a bottle of Floquil Bright Silver was selected and airbrushed over the side fluting. The model is now awaiting a gloss coat so that decals can be applied to the model.


The contrast of the black roof, light gray/tan sides, and silver fluting really make this car an oddity of the SCL roster given a majority of the "Silver" fleet was natural stainless steel. The progress has been slow, but once decals are applied, the car sides will receive the American Model Builders window set 923.

Due to procrastination on my part, I was fortunate to purchase an image of SCL 5259 in the late 1960s in train which shows a relatively fresh appearance of the car. The image will be incorporated into an article on the model in a pending issue of the Seaboard-Coast Line Modeler.

Tuesday, January 2, 2024

Pacific Fruit Express R-70-24: SPFE 459553

To continue my builds of insulated boxcars, I decided to model a PC&F built 57' RPL. Not having a clue as to how to letter these, I turned to several sources to include Dick Harley's PFE clinics, the Microscale decal prototype sheets, photographs from Railgoat, and the always resourceful George Elwood's Fallenflags.org. 

My vision for the reefer block northbound from Florida is to have a majority of FGE cars interspersed with WFE, SFRP, and PFE cars. The area I model was frequented heavily by blocks of cars for produce, beer, and other ladings requiring refrigeration and temperature control . The "foreign" cars will be representative of the region and likely include only a single or two examples of each.

George Elwood took this image of SPFE 459530 in North Little Rock, Arkansas sometime in the 1970s, and after a hunt for several months, I located a nearly new example of SPFE 459553 as found in the Morning Sun Books Vintage Freight Cars 1960-1980 by Paul Winters.

Volume 4 of this series contains an excellent prototype image of SPFE cars ranging from the R-70-20 and R-70-24 series. In hindsight, I should have purchased the Big Orange Book (Pacific Fruit Express by Thompson, Church, and Jones once published by Signature Press) to assist with lettering placement and prototype history. 

The R-70-24 consisted of 600 cars numbered as SPFE 459501-460100. The class was built only with Hydra-Cushion underframe components, and included several repaint variations throughout their service lives. To accurately model SPFE 459553, I learned several detail combinations were necessary to model this series of cars to include the "late" roof, small mechanical intake screen, Hydra-Cushion underframe components, and a modern brake wheel. The Intermountain Railway Company car is an excellent basis to build from and the prototype selected was constructed in 1971 placing it within my era. The kit assembled beautifully and without any issues, given I assembled it into major components such as the underframe and body. I replaced the trucks with Exactrail 70 ton trucks which were weathered separately. and have set aside the small details such as the stirrups and ladders until the very end of construction. The cut lever brackets are subject to errant removal during the build process, so care is needed.

The model was primed in white, and the car body color is represented by Modelflex Daylight Orange while the ends were painted with Tamiya gloss black. The roof was also primed in white and all of the components were overcoated with Testor's Glosscote. I began looking for decals and came across Dick Harley's PFE pages which also shed some light on the details of these cars. Lastly, I ordered two sets of PFE decals from Microscale 87-1341 and 87-1357. Both sets are useful and include separate decals needed for this model. 

Some small details unrealized by this predominantly FGE modeler are as follows:

  • The Southern Pacific herald denotes the "B" end of the car
  • The service plaque is an oblong affair
  • The cutting of PFE decals is to be done vertically to maintain alignment with the door stops
  • The second letter "I" in PACIFIC rests adjacent to the upper door stop which requires additional cutting
  • The best method to lettering your car is to decal from the sill to the eave to maintain prototype spacing
  • The trust data can also appear as a weathering artifact on the lower sill but it isn't
  • The ACI label position can vary
  • Door track lengths are vitally important
  • Reporting marks on the ends can be placed above or below the uppermost reinforcement rib
  • End lettering is typically minimal consisting of Spring and Wheel data
The model as seen below shows my progress thus far and needs only a few additional details installed and several coats of gloss and flat coats to be considered ready for the rails. Weathering will be minimal to follow the prototype, but enough to show usage on it's journey.


Sunday, November 12, 2023

FGEX 50098 - An old project


Several years ago when Intermountain released their FGE refrigerator, I purchased some undecorated kits and decals that would be sufficient. I located a prototype image of FGEX 50098 in one of the volumes of Classic Freight Cars and set to work. The model was assembled per the instructions without any fanfare as is typical with some of my projects. The car was painted with Pollyscale Reefer Yellow, Floquil Oxide red, and Floquil Old Silver. The decals were sourced from the only available FGE decal set of the time, Microscale 87-238 and the car was weathered per the prototype image. I have always enjoyed all things FGE and hope this serves as inspiration for others. Now that I am far more knowledgable about the FGE/WFE/BREX fleet, this model has become the lone example of the prototype while other steel reefers are constructed.