Showing posts with label FGEX. Show all posts

Saturday, July 6, 2024

Fruit Growers Express RBL Part 5 - SAL 591181


SAL 591181 is finally complete, and it was clearly far too long of a build, but worth it. The model is ready for weathering, though I like the almost new appearance of the RBL at this point. The Dan Kohlberg decals are exceptional, and by exceptional, I mean the best decals ever created, ever, period. 

The model now joins the rest of the reefer block cars and I'm slowly eyeballing another build if I can get my hands on an undecorated kit. I've yet to experiment with one of the painted unlettered Moloco cars, but it could be in the cards for my next FGE project. If Moloco wants to become a Fortune 500 company of the modeling community, just sell me more FGE kits.

Sunday, November 12, 2023

FGEX 50098 - An old project


Several years ago when Intermountain released their FGE refrigerator, I purchased some undecorated kits and decals that would be sufficient. I located a prototype image of FGEX 50098 in one of the volumes of Classic Freight Cars and set to work. The model was assembled per the instructions without any fanfare as is typical with some of my projects. The car was painted with Pollyscale Reefer Yellow, Floquil Oxide red, and Floquil Old Silver. The decals were sourced from the only available FGE decal set of the time, Microscale 87-238 and the car was weathered per the prototype image. I have always enjoyed all things FGE and hope this serves as inspiration for others. Now that I am far more knowledgable about the FGE/WFE/BREX fleet, this model has become the lone example of the prototype while other steel reefers are constructed.

Friday, June 9, 2023

Beware of Squirrels: Past Projects and New Projects

Most recently, I decided to clean out several tubs and totes filled with project materials in hopes of sorting through several thousand detail parts, decal sheets, and under construction projects. Most of which I remembered building, but in my typical, "Look, Squirrel!!" brain, I often push it aside to model something a bit more interesting. 

I've learned through the years, the enjoyment of the hobby for me is the teardown and rebuild process. Painting is usually the least of my favorite aspects of the hobby, but decaling is certainly one of my favorite aspects of prototype modeling. 

In hopes of combating the ever growing list of under-construction projects, I decided to document the list so I have a record of sorts to determine the hierarchy of what to model.

SCL SDP35 616:

An Atlas rebuild with Cannon fans, new underframe details, ESU EMD 567D prime mover, speaker and LED installation.

SCL GP30 1320:

A Proto 2000 GP30 project still in the parts collection stage. The model was striped, grit blasted and is ready for detailing. The locomotive will be DCC equipped, and detailed with wire handrails, and SCL era appropriate details.

Seaboard Air Line #2 Depot:

Constructed as the Wimauma, Florida depot, this is a fun diversion from freight and locomotive projects, but I'm finally getting around to obtaining some parts which were never provided by the manufacturer. The current state of construction is stalled at window installation, and adding a stepped landing. The model is fully painted and awaiting these final details before the roof is sealed and added.

Fruit Grower's Express SAL 591181 RBL:

Still waiting on decals and completion. Such a fun kit to build, paint and construct, but shiny objects got in the way. 

SFRP Rr-56 2106:

Almost across the finish line on this one with some final detail painting left to do. The weathering process and addition of appropriate trucks (Plate C Models, are you out there?!?!) is keeping this one just shy of the finished mark. The Rapido sound units must be made of unobtainium as I've not heard (see what I did there) a sound of them. Still a really fun project and the rebuild, repaint, and decaling process was thoroughly enjoyable.

PFE R70-20:

Part of the reefer block, this one has been fully built and is awaiting the application of black ends and is ready for decaling. This car has been one of the reasons I began building a reefer block in the first place, and again a great kit build.

Seaboard Air Line and Seaboard Coast Line 40' PS-1 Boxcars:

I constructed and have begun the weathering process of the SAL PS-1 in the 1964 Billboard Gothic scheme using the Kadee PS-1 model and it is all built completed. Meanwhile, the SCL PS-1 will be a beer service car which I recently located an excellent prototype photo to finally complete the research process. The SCL variation is painted, and in need of a gloss cote so that decaling can commence. Sadly, there is not an overabundance of photographic evidence of these 40' boxcars.

SCL K-19 Gondola:

This is a Tangent Scale Models parts build and is in the process of receiving decals at the moment. The car is fully constructed, painted and receiving a variety of SCL decals. Likely the closest project to completion given my current push.

SCL U36Bs:

A complete rebuild of the Atlas U36B underframe is in order, and the cab numerals have to be removed and reapplied given the "thinness" of the font used. Once upon a time, Atlas hit dingers when it came to SCL locomotives, but their artwork needs some resuscitation.

SCL RS-3 1155:

A complete Stewart and Atlas franken-Alco project. The model will utilize the Stewart hoods, sill, and an Atlas cab. The majority of the details will be sourced from KV Models as they have made construction of these workhorses easier.

SCL Split Image Alco S-2 and S-4 switchers:

Alco switchers have been a staple of my modeling for decades, and I love the looks and sounds of an Alco. The four of these switchers will be in various states of the Seaboard Air Line inspired black and red Alco switcher split image scheme, while others will find their way into the typical black and yellow Bumblebee paint scheme. Thankfully, Atlas retooled the cab windows to accurately model the later Alco S-4 cab appearance, so these should be a fun painting process.

SCL 5259 Pullman Plan 7600 52 seat coach:

What a project. I'm certain this is one of the longest builds of my model making career and I've lost, found, lost, and found again parts for this car. It is in pieces some of which were waiting for the proper shade of suede, deck tan, and silver. A majority of this car is done, but again squirrels found their way onto my work bench.

SCL 35 Split Image NW2:

If you have ever run a Kato locomotive, you well know that they are simply the best performing locomotives in our hobby. The model was converted to DCC after grinding the frame, and then the shell work began. The lowly switchers get sidelined the most, but it currently appears to be in a porcupine like state with all the various holes filled with styrene rod so that KV Model parts can be applied. The NW2 needs the most work of all my locomotive projects, so I truly need to dedicate some attention to this much needed prototype. It is fitted with a TCS Micro decoder and is in need of reassembly and final construction. I've lost count of how many times I found another example to model, and am waffling about the application of roller bearings to the side frames still. Finding an intact SCL NW2 with solid bearings is akin to finding a hen's tooth.

Seaboard Air Line and Seaboard Coast Line P-9 Phosphate Hoppers:

F&C kits abound throughout my collection in various states of construction. I need only 92 more of these to complete my endeavor, but I really need to consider some 3D printed details or etched ladders to make these as good as I want them to be. "Model Phosphate Trains, It will be Fun!" says the guy....

This is a short list of current projects, and in no way accounts for what other treasure I located such as fully re-constructed SW9s, DS4-4-1000s, SDP35s, GP40s, and many more. Beware of the squirrels, and in a year, I hope to have finally put some of these projects into the pages of the Seaboard-Coast Line Modeler. 


Monday, March 7, 2022

Fruit Growers Express RBL Part 4: The Prototype Shift

The prototype shift is an event which occurs occasionally at a modeler's workbench when something just isn't quite right. I've learned to avoid drastic measures when this occurs, but its not fun, and is usually due to the lack of attention to detail and/or a lack of information.

While examining the prototype car, SCL 590513, during decal application, I determined something was amiss. 

SCL 590513 was built with a larger door which extended the door tracks further to the right of the door. The addition of a small "one third" panel immediately adjacent the door is also not present on the Moloco model which means, the selected prototype while close, wasn't on the mark. 

When looking at additional images of a similarly built FGE RBL, the differences begin to be realized. The door track does not extend to the right of the door as far, and the additional "one third" panel is not immediately adjacent to the door on cars with smaller door openings. While seemingly insignificant at the time, I learned the larger door size meant that lettering differences were bound to occur. Lesson learned.


The remaining details are correct for the selected prototype and model, so a prototype shift is necessary. In fact, the only detail discrepancies between other series is the lack of a door securement device to the right of the door, and the placement of an additional trust plate.

Luckily, I turned to G. Elwood's FallenFlags website which contained an October 1965 image of SAL 591181 captured by Leroy Dozier. The car is from a 50 car series built in 1963 and numbered in series SAL 591143-591192. The cars were selected as follows for loading points and specified shippers:

SAL 591143-591157, Assigned to the D&S, Durham, NC

SAL 591158-591167, Assigned to Wildwood, Florida

SAL 591170-591172, Assigned to Hillsboro, Florida (Anheuser Busch)

SAL 591173-591174, Assigned to Hillsboro, Florida (Schlitz Brewery)

SAL 591175-591192, Assigned to Wildwood, Florida

The cars assigned to Hillsboro, Florida (located south of State Road 582 also known as Fowler Avenue in Tampa, Florida) served the various breweries in this area. The car numbers were conveyed to SCL at the 1967 merger and remained unchanged.

The prototype image below, which shows some mold damage, fits into the era I am modeling and will now serve as the prototype for the Moloco build. Unfortunately, an image of an SCL repaint from this series of cars in the as-delivered scheme has not surfaced. 


While the prototype shift results in additional work since I am far enough along with the decaling process, I feel this is the best means of achieving an accurate model.

Saturday, March 5, 2022

Fruit Growers Express RBL Part 3: Decals


The application of the Kohlberg FGE decals has begun. As mentioned earlier, if you need FGE decals there are no other post-1960 decals that are better. The decals are super thin, printed with extreme accuracy and are truly the best around for a project such as this. I have used others and there are none better. 

The various details on the sides of the model such as door stops necessitate the cutting of the decal film between the stripes. The left hand cut is measured 19.5 scale feet from the decal edge. To allow for additional room for movement, the decals were cut an additional scale foot on either side. The right cut allows for less room to maneuver, so the decal was cut completely at this point. Two small indications are located above and below the area as reference. The right hand edge should also be trimmed approximately 18 scale inches to follow prototype photos.

The images below show the progression of the decal puzzle and I am one of those “line by line” modelers who have no qualms splicing up lettering sets to accurately model the prototype. It’s a disease, but to my eye if you can determine the data, it should be represented in part or whole if known.


The decals are placed onto the model following photos, and will mirror the prototype image. Unfortunately, I do not know the loading destination and return information, so I will likely letter the car to return to a local Florida destination allowing for modeler’s license. 

The remaining decals to be applied consist of the reporting marks, capacity and car weight data, car classification along with some small build date information. The Kohlberg decals allow for many variations which give the modeler options to choose from. If you haven’t ordered a set, visit ICG Decals and review the artwork on the set above.

As decaling progresses, additional photos will be shared as progress continues. As a rule, the sides and ends will be over sprayed with a gloss coat to hide any decal edges and once dry, Scalecoat Flat Glaze will be airbrushed so that a flat finish is achieved.

Monday, February 7, 2022

Fruit Growers Express RBL Part 2: Primer and Paint


Paint and primer, while not overly exciting can lead to exhaustive conversations about color, hue, lighting, photographic degradation, film equipment used, etc..... It's safe to say that your eye, prototype documents, and a color photograph will often get you close, if not exact. Since SCL 590513 was constructed well after the advent of color film, we have an ample amount of information to use in the painting of the model. The above prototype photograph courtesy of G. Elwood's Fallenflags website, shows that the steel RBLs were often staged and painted in large groups. Leroy Dozier captured this image in Alexandria, VA on September 5th, 1965.

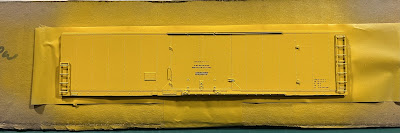
Following construction, the model was washed with warm soapy water, rinsed and allowed to air dry. The model was then grit blasted and washed a second time to eliminate any residual oils and remaining grit from the car components. The application of Tamiya light gray primer was applied to the components and this was allowed to dry. To keep the components properly oriented, I label the respective colors so that should I be consumed by lacquer fumes, I won't forget which color to apply. 


After the primer dried for at least 24 hours, the model was then airbrushed using Floquil Reefer Yellow, Old Silver, and Oxide Red. The light gray primer lends itself to well to the application of these colors and gives an appropriate color representation of the final shade. 


The Floquil paint was applied at 20 PSI using multiple light coats so as to minimize any build up. The model was then overcoated with Testors Glosscote once the Floquil no longer smelled. The car is currently awaiting decals using the Kohlberg FGE SE-22 and SE-24 sets.


If you look closely at the edges of the roof, you can see the application of yellow to the eaves. When airbrushing the roof, it is important to apply a few passes of the carbody color to the edges to represent overspray. Floquil Reefer Yellow is an interesting color as it typically varies when applied over a white, gray and red primer base. Following the successful application of my previous FGE car, I used Tamiya light gray primer as it yielded an acceptable color representation.

The prototype cars used a rich Chromate based yellow which was often applied over a red zinc primer. The gray used on the model also provides a rich yellow color, however, I have not explored the possibilities of using a red zinc primer similar to the prototype, but it will provide some interesting contrast to the model if I am able to locate an additional kit. 


An unidentified FGE car was captured in Alexandria, Virginia by Leroy Dozier in August 1967 which demonstrates the primer application applied to the steel components of the car. The prototype appears to be a later production car with alternative center riveting on the opposing side of the support posts which became commonplace during the steel era of the late 1960s. Of note the roof has not been applied, likely due to the pending insulation of the exterior structure.


One of my favorite colors for underframe components, truck and side frame components and wheel faces is Rustoleum Camouflage brown. This is a "spray bomb" can available at your local hardware store, but it dries completely flat and is an acceptable representation of the old Floquil Roof Brown. The underframe, trucks, and draft gear were painted and installed once the paint dried. The draft gear was painted with Floquil Oxide and gives an interesting contrast, but follows the prototype.


The next post will detail the application of Dan Kohlberg's excellent decals and final construction of the car and details.

Monday, January 24, 2022

Fruit Growers Express RBL Part 1: Car Construction

Prototype images courtesy of Moloco Trains

I have an admiration for all things FGE and the consortium of companies which ultimately lead to one of the most successful refrigerator and insulated boxcar fleets in the nation. While FGE is typically regarded as a southeastern, mid-Atlantic corporation based in Alexandria, Virginia, it spread throughout the nation with the addition of CB&Q, Great Northern, National Car Company, and other assets.

During the steel and mechanical era, a FGE car could be seen anywhere throughout the nation which accepted mechanical refrigerators, top iced reefers, or insulated boxcars. These cars roamed far and wide and were often in dedicated service hauling temperature sensitive lading. The utilization of these cars ranged from produce, meat, beer, and just about any commodity imaginable. The obvious appeal is also dictated by the era and area I model, Florida in 1967-1970 which typically saw groceries and inbound beer shipments to the area with outbound produce and orange juice to points north. 


One of my favorite models is the Moloco FGE 54'10" FGE built RBL with 10' doors. The kit is no longer in production, however, several Ready to Run models in both Seaboard Air Line Railroad and Atlantic Coast Line Railroad are available directly from Moloco. During the 1967 merger, Seaboard Coast Line inherited 1,599 cars from various series and can be discerned by their first digit of, "4" for former ACL equipment, and, "5" for former SAL equipment. I elected to model SCL 590513 which was constructed in 1963. The prototype was part of the SCL 590500-590058 series of cars rated for 4,595 cubic feet, an interior length of 50'0", Keystone center of car cushioning, and was rated for a nominal capacity of 125,000 pounds (62.5 tons). The prototype also featured a 10'7" door width, and was painted in the typical FGE yellow/oxide brown scheme with "For Greatest Efficiency" lettering.

Below you will find the Seaboard Coast Line 1967 list of combined assets which show the various series and their measurements.


The kit (part number 33001-00) while fully encompassing is quite a puzzle of plastic if you have never constructed one. Additionally, the instructions provided are not specific to the FGE kit, so while constructing my model of SCL 590513, I decided to take some time to address the components utilized for a Keystone cushioning equipped car. The existing Moloco instructions will better serve to orient you to the kit components, however, I hope this will serve as a guide for this wanting to model from the kit. The kit is assembled as a flat kit and having some experience with these kits, I wanted to share my experiences with fellow modelers as there are subtle construction techniques which can save you frustration and time.

The kit consists of a detailed underframe, highly detailed sides, 4/3/R1 improved dreadnaught welded ends, and a Stanray diagonal panel roof with a FGE specific running board and laterals. It also includes Kadee 158 couplers and highly detailed 70-ton ASF roller bearing trucks. The details provided are some of the best available and the only items necessary to complete the kit are paint and decals. 

Speaking of decals, those too are covered thanks to Dan Kohlberg's excellent decal sets which cover a full range of FGE cars. There are no finer HO scale decals are available for these kits, so don't waste your time or money with the usual companies as they simply do not compare (Dan Kohlberg FGE Decals are available through the link).

The kit should be opened and inspected for all of the necessary parts which you will quickly see there are extras of nearly all utilized components. The included parts allow the modeler to accurately construct the Keystone or Hydra-Cushion equipped cars. Seaboard Air Line favored the Keystone equipped cars while ACL favored Hydra-Cushion equipped cars.

To begin construction of the kit, you will need basic tools to include a good set of tweezers, a sharp Xacto #11 blade (use and change them often), a Phillips head screw driver, side cutting sprue nippers, a pair of Xuron flush cutting pliers, a pin vise with #79 and #75 drill bits, a small 000 paint brush for applying liquid cement, scrap wire for applying small amounts of adhesive such as CA or Cypox, and a scrap of .030" styrene for application of the side grab irons.

To construct this car, the modeler needs to recognize that it is best practice to assemble it into components for two reasons - paint separation and decals. Not all parts should be applied until after painting and decaling are completed.

While this is a flat kit, it lends itself well to multi-color schemes such as the early FGE scheme. The roof will be silver, the sides will be yellow, the ends, draft gear will be oxide brown, the underframe and trucks will be weathered black. The appropriate paint can be sourced from Tamiya, Mission Models, and Modelflex if desired. I have a collection of Floquil paints that I continue to use, and as such will be utilizing the appropriate colors from my remaining stock.

Bill of Materials:

  • Moloco 33001-00 50' FGE RBL Plate B 7+7R, 10 foot centered plug door kit
  • Dan Kohlberg FGE SE-22, SE-24 FGEX decal sets
  • Tamiya Primer
  • Floquil Reefer Yellow or equivalent Chromium yellow
  • Floquil Oxide Red or equivalent oxide brown/red
  • Tamiya X-18 semi gloss black
  • Rustoleum Flat Brown, Camouflage series 
  • Tamiya XF-20 thinner
  • Lacquer Thinner
  • Pacer Canopy glue
  • Cypox adhesive, Testor's Liquid Cement

Sides:

The Moloco kit is offered with 10' and 12' doors and as such there are two door track widths and two door rod widths to consider. The sides are the most basic component of the kit and require only two parts be applied at this stage of construction. The side grab irons are nested into the corresponding grab iron holes and then cemented into place. Use the .030" styrene spacer to achieve the proper offset from the side and then select and remove the narrow door rod width door tracks. 


These are removed using side cutting nippers and are delicate, so take care to not bend or break the tracks as the resulting rebuild is not great fun. Using a small amount of Testor's liquid cement, apply small amounts with a 000 brush into the corresponding holes along the sill and press gently into place.


Roof:

The roof is prepared for assembly and includes the fully accurate Morton running board in place. The modeler will need to examine the overhanging portions of the running board to ensure they are not torqued to one side and will align with the support applied to the end. The corner grab irons and corresponding eyebolts are in place so no installation is necessary. If necessary a small amount of Canopy glue can be applied to the interior supports which run below the roof. This will serve to strengthen any loose joints that are not mechanically bonded.


Ends:

The ends are some of the finest examples of a welded FGE end to date in HO scale. The ends are easily distinguishable due to the number of pre-drilled holes included on the B end. The ends are detailed accordingly using the kit supplied end ladders, cross over platform,  cross over grab iron, brake platform, tack boards, uncoupling lever support, brake wheel housing, brake wheel support plate, brake wheel, and running board support.


Begin construction with the A end and drill out the small holes using a #79 drill bit. These include holes for the end grab iron, running board support and cross over platform. The larger holes were drilled using a #75 drill bit to accept the end ladders.

 
There are multiple variants of tack boards included in the kit, however, there are two sets which include the appropriate mounting pins on the reverse, non-detail side which correspond to the ends. Use a small amount of liquid cement and press the tack board into place. The installation does not require additional drilling, but be sure to dress any of the edges which may contain remnants of molding. 

The running board support was installed next using Cypox adhesive. The ladders and running board support are molded in yellow and are made of a slippery type of plastic, as compared to other parts. Removal of the ladders and supports requires care and should be removed with side cutting sprue nippers. A small amount of Cypox was applied with wire and then the cleaned, dressed part was installed. The end grab iron was installed last also using Cypox and adjusted for height prior to the cement setting. The brass cross over platform is pre-bent and was then cemented into place using Cypox. When reviewing prototype photographs, I noted the uncoupling lever support bracket matched the steeper angled version included and removed this part from it's corresponding sprue. The part was cleaned, dressed and cemented into place using liquid cement. Once dry, the end was set aside and construction of the B end was begun.


The build sequence on the B end can be challenging as compared to the A end. The holes were drilled accordingly utilizing #79 and #75 drill bits as with the A end. It is best to install the tack board, the running board support, retainer valve, and brake wheel support bracket first. The included wire (the longest of three short lengths included in the kit) was cemented to the end of the chain linkage of the brake wheel housing utilizing Cypox and allowed to dry. This will be applied later in the construction process of the end. My kit did not include a retainer valve line, so I used a small amount of Tichy phosphor bronze wire to construct this detail. The retainer line was then cut to length and cemented into place. The end grab iron was then installed followed by the cross over platform. 


The brake wheel housing (Ajax housing and Universal brake wheel were utilized on the prototype) was removed from the sprue and cleaned. Moloco includes all variants of common brake wheel housings in the kit and four Ajax brake housings. The housing and brake wheel were cemented together utilizing liquid cement. It is important to note that the brake wheel mounting pin will extend beyond the back of the housing and it should not be sanded or removed as it aides in locating this detail part correctly. Using fine tweezers, fish the linkage through the cross over platform and cement the brake wheel housing and wheel into place using liquid cement. The housing should be aligned so that it is straight and vertically aligns with the lower support bracket below the opening in the cross over platform. Once dry, install the appropriate end ladders into place and allow to dry. The remaining brake platform requires bending to shape using smooth jaw pliers. The platform was then cemented into place and the support legs bent inward towards the corresponding NBW detail. The final detail is the uncoupling lever support which was installed similarly on the A end. By constructing in this sequence, it will eliminate the details becoming crowded and interference with alignment. 


Set both of the ends aside and notate each end accordingly. As practice, I mark each end with a permanent marker as "A" and "B" on the reverse side so as to eliminate any error during the final construction of the car. The final details to address for the ends are the uncoupling levers which are constructed of etched brass. The below photograph shows the angled extended position of the prototype uncoupling lever support brackets. The etched brass details were bent using smooth jar pliers into shape. These will be applied during final construction, however, they will need to be painted separately.


Underframe:

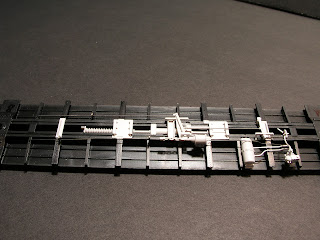
The underframe consists of many varying plastic and wire parts which are seen below. Being a modern insulated boxcar, the prototype is equipped with AB brakes and includes a main reservoir, a brake cylinder, an ABD valve, a bell crank, slack adjuster, hangers, and cushioned draft gear. It is the most daunting portion of the build, so I will simplify it as easily as I can. Please remember, I'm a modeler and not a freight car builder or designer, so many of these terms are based upon that inference and what I can determine based upon my own knowledge.

As with the ends, the underframe is marked as, "A" and "B" to assist in construction of the various components. The U shaped portion of the return spring should face the B end of the car. The B end of the car includes an additional hole adjacent to the draft gear holes for installation of the hand brake fulcrum. Once you have identified the B end of the car, remember that prototypical installation of the kit's components will need to orient appropriately towards the B end. The brake cylinder piston should also face the B end of the car as a reference.

To begin construction, install the Keystone cushioning device and return spring within the center of the underframe. Using a 1/16" drill bit, the holes were drilled, cleared and liquid cement was utilized to install these details. The floor of the kit is annotated with several markings that while not divulged can be determined to be appropriate. This is now hidden by the weight in my model, however, utilize the holes annotated as, "10K" and "10KS" when constructing the 10' centered door with Keystone cushioning. The remaining annotations are meant for larger 12' door opening cars and those equipped with Hydra-Cushion cushioning devices. 


The sill of the underframe is loose during initial construction, however, as appliances are installed, a small amount of liquid cement will join it to the floor. Once affixed together, install the various cross members and supports into their appropriate locations as shown. The air cylinder and slack adjuster were installed into their respective location using liquid cement and allowed to dry. The AB valve was then installed and the brake lever and associated support adjacent to the A end was installed. The parts are designed so that they nest into the center sill and cross members. Once the details were in place, I installed all of the brake rods, air cylinder piping, main lever brake rod, ABD valve piping, and hangers into place using Cypox. The longest hanger is oriented closest to the center of the car while the remaining two smaller hangers (U shaped metal straps) are located on opposing cross members. The final detail installed on the floor was the brake reservoir and dirt collector. These were cemented into place using liquid cement. It is important to note the air reservoir will not extend completely to the car floor as it supported by the side of the car once fully assembled, so take care not to damage the part. 

The following images showcase the great detail that Moloco has afforded modelers and when in ready to run form are rarely seen.


Draft Gear:

Moloco includes two types of draft gear boxes with the kit which include an Early FGE draft gear and a later FGE draft gear. The biggest difference that I was able to observe was the side key detail and shape of the associated block detail. The assembly is straightforward as the parts align and are keyed appropriately. Once assembled, install using the provided screw and remove the trip pins of the supplied Kadee couplers if desired. The draft gear will be removed and painted Oxide Red during this stage of construction. The included rubber air hoses will not be installed until the final stages of construction. Once the underframe and draft gear were completed, I installed the weight using 3M silicone.


Trucks:

Moloco includes one of the best renditions of an ASF 70-ton ride control trucks on the HO scale market. These trucks are free rolling and include the appropriate brake beams, spring pack detail and typical, "Chin" seen under the spring pack. The wheels will be removed, painted and the trucks reinstalled. The trucks when applied to the model include a small metallic washer to support the screw head so retain both parts for installation. 


The next installment of the build process will include a grit blasting of the model, application of primer and then airbrushing appropriate colors onto the model in preparation for decaling. Small details such as the side ladders, stirrups, door rods, uncoupling levers, and air hoses will be painted separately for final assembly. These details will interfere with the application of decals, or are delicate so they were not installed during initial construction.


Wednesday, February 3, 2021

ACL 490317 - Progress


The Moloco diagonal panel ZU roof was installed on ACL 490317. Adding Evergreen HO scale 2 x 8 strips along the inside edge was the first step which were cemented so that 2 scale inches were visible above the car side. Using a scrap of the same strip allowed me to gauge the appropriate height. Once cemented into place, an additional length of Evergreen HO scale 2 x 2 was then cemented to the top of the car edge. The 2 x 2 should be placed against the roof edge and the portion of the 2 x 8 that was previously installed. Once the styrene was fully cured I lightly sanded the styrene using 800 grit sand paper so that any glue residue was removed.

A length of HO scale Evergreen 2 x 6 strip was cemented to the uppermost portion of the end so that it was flush with the rear surface of the end. The 2 x 6 will be trimmed so that it does not interfere with roof placement and so that it will not be visible. Due to adding additional height to the roof the end height must also be increased.